Wednesday, 4 April 2018

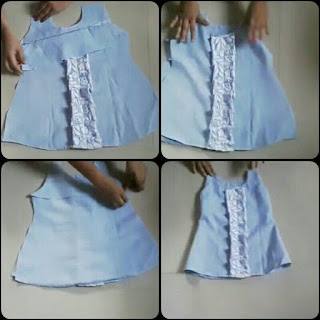
HOW TO MAKE A FROCK FROM AN OLD OR USED SHIRT

HOW TO MAKE A FROCK FROM AN OLD OR USED SHIRT


So let's start for making frock from an old shirt, first we have to remove cut sleeve, color & also have to remove pocket.

Now measure the length of frock with the help of inch tape & cut the rest of useless part.
Then stitch the centre & fold it for measuring.

Measure shoulder as 4 inches, Armhole 4 inches, chest 7 inches, neck 3 inches, neck broadness 2 inches.Now cut it where you have drawn line with caryons.

For making a design cut a little piece of cloth from sleeves now stitch it & apply lace the stitch it from 3 corners & leave.

Now fold it 1 corner as we can't see the thread of stitching. Have a beautiful design as it looks pretty now stitch this lace on the front side at the centre. Now the piece which we cut before take it & use it for making neck broadness in both side (front & back).

Now finally stitch both side together. The new baby frock is ready to wear.

Monday, 2 April 2018

HOW TO SEW A SIMPLE PAINT

How to sew a simple paint


First we place a paint that tit will use it as a pattern like, So we cut out front & back panels.


Place front & back panels together & sew the crotch seam.


Put pins on front and back panel together & sew.

Fold the waist part 2cm inside & sew around & leave a opening for the elastic fold the hem 2cm inside & sew around.


Now use the safety pins to pull the elastic through the opening we made earlier.

After putting the elastic through the opening sew it together with a zigzag stitch, don't forget to sew close the opening.

Now We Are Done

Sunday, 1 April 2018

DIY DESIGNED CAP CUTTING

DIY DESIGNED CAP CUTTING

Hellow friends today we are making designed cap & now a day this type of cap is mostly use because which we can wear easily on different types of shirt, t-shirts tops.

STEP: 01

So for making this designed cap we need 1 yard of net & lace, which will use on the bottom of cap
Firstly we have four fold of this net. Then we marking from centre 17 inches on all round we mark 17 inches but you can take very, then we join all mark for round shape.

STEP: 02
In this way we are marking for neck & takes 2 inches of length & 3 inches of breathe you can take 3 by 3 inches then join both these point for round shape. Now we just cut this then we open this cap.

STEP: 03
Now we start sewing first we make neck then we take strip which we use around the neck then we put notches then take double fold to inside now we sew.

STEP: 04 
Finally we apply lace on the bottom of cap for looking prefernce. Our designed cap is done.


HOW TO MAKE AN EASY DRESS

HOW TO MAKE AN EASY DRESS


The dress is very easy to stich and it looks very nice & seems to be very comfortable and reliable for daily wear.

Now there are some steps by which you can stich the dress in easy way.


STEPS: 01   WHAT YOU NEED

First you will need a ribbed tank top, you could also use a t-shirt for making a dress & 3 yards of matching fabrics.


STEP: 02     MAKE THE CUT PIC
Cut the tank top almost in half this is really you preference. It is depending on your bust size & how short you want to your dress. The shorter the tank top, the shorter your dress will be, but if you like to wear long then take fabric for.


STEP: 03     SEWING IT UP
Now take the fabrics for bottom part of your dress & wrap it around your waist about it & a half times & cut it in a straight line. The fabrics will come to you already folded, don’t it unfold, in this way you have a kind of bubble hum.
Next you fold your fabrics in half remember it’s already folded, so you are folding it again creating a shirt sew up to short side (there will be four layers of fabrics that you are sewing.
 
STEP: 04     MAKING THE RUFFLES
Then you have a big blocky rectangular shirt. Next open it up and change your sewing machine’s tension so it will create the biggest stitches possible. Instead of sewing a waist bod in like a normal skirt. You are just sewing a straight line around the two layers of fabrics join together.

We are going to create a ruffle, don’t do a back stitch when you start sewing around the skirt make sure the skirt ruffle are evenly distributed & pretty loose.
 
 STEP: 05     SEWING THE TOP TO THE BOTTOM

Now turn the skirt part inside out so that the raw edges (from when you turned it into that big blocky skirt) are out put the tank top inside as pictured.
Next you will the top and with dress together.
One’s it pinned make sure that the tank top part of the dress folds out to be inside out like the skirt part.
Make sure your tension is set back to normal and sew the skirt and the tank top together just under the previous stitches.
 

STEP: 06     ALMOST DONE
Now remove the pins which you were put & the dress part is.
 
 
STEP: 07 THE FINISHING TOUGH
Cut the strip out of the left over fabric about double of how thick you a want your sash to bed. Fold it in half long ways so that the printed side is facing in and sew up the sides.

Turn it right side out and finish up the edges, and you are done! The sash is not actually sewn onto the dress, it’s removable and is just tied in the back you could always easy to regular belt or another co-ordinate fabrics for the belt.


STEP: 08 FINISH


HOW TO MAKE A FROCK FROM AN OLD OR USED SHIRT

HOW TO MAKE A FROCK FROM AN OLD OR USED SHIRT So let's start for making frock from an  old shirt, first we have to remove cut ...